

This is the second in a series of ‘how-to’ articles on creating an interactive Alexa Skill. The skill is called ‘Fizz Buzz Bongo’ and is available in the Alexa Skills Store. It’s a variation on the classic ‘Fizz Buzz’ programmer test, but converted into a game. The first articles detail explain the Java code and how to build it, then how to deploy it to AWS using Terraform and finally how to register the Alexa Skill in the Amazon Developer Console.
Full source code is available at https://github.com/adrianmilne/alexa-fizzbuzzbongo-skill. Click the links below to see parts 1 and 3:
- Developing an Alexa Skill: Part 1, Create Java Lambda
- Developing an Alexa Skill: Part 2, Deploying to AWS Using Terraform
- Developing an Alexa Skill: Part 3, Publishing the Skill
Prerequisites
This article is a follow up article to the first article “Developing an Alexa Skill: Part 1, Creating the Java Lambda”. In that post I describe everything you need in order to checkout the source code and get it to build into a JAR file containing everything it need to run as an AWS Lambda.
The entry point for this post is that you have the source code on your machine, and you’ve run a succesfull build using Maven, which has produced the following file in your /target directory
alexa-fizzbuzz-demo-0.0.1-SNAPSHOT-jar-with-dependencies.jar
(Note – the actual version number may be different at the time you check the code out).
Deploying to AWS UsingTerraform
So the next step is to get that file uploaded to AWS. However, we also need a DynamoDB table and set up all the permissions correctly. While it’s possible to do this by hand purely using the AWS console, it’s better practice to automate this in code.
Building your service is known as “Infrastructure as Code” (IaC) like this allows you to document your infrastructure and recreate it easily if you need to. This is especially important as it grows and becomes more complex. Doing anything by hand is time consuming and error prone, and it can be easy to forget what you’ve done down the line. Far better to spend a bit more time up front automating it – and then everything downstream becomes easier (and more robust).
In this initial demo I’ve chosen Terraform – a popular and feature-rich cross-cloud solution from HashiCorp. In a later article I’ll do the same thing using native AWS CloudFormation. In order to get started – you’ll need the AWS CLI and Terraform installing on your machine.
Download the AWS Command Line Interface (CLI)
If you haven’t done so already – download and install the AWS command line tools from https://aws.amazon.com/cli.
Configure your AWS Credentials
There are a number of ways to configure the CLI with your AWS credentials – credentials file, config file, environment variables, etc. I won’t try and cover them all here – check out the AWS CLI documentation for details.
Terraform will pick up your credentials from the AWS CLI.
Alternatively – you can supply them directly in the terraform template file if that’s easier. Just edit the main.tf file at:
/repo-install-location/alexa-fizzbuzz-demo/IaC/terraform/fizzbuzz/main.tf
Uncomment the ‘provider “aws”‘ section at the top, and replace the placeholders with your AWS credentials. These are available from the AWS IAM console.
provider "aws" {
  access_key = "INPUT_HERE"
  secret_key = "INPUT_HERE"
  region     = "INPUT_HERE - e.g. eu-west-2"
}
The downside to adding them here, is that if you commit it all your key information is in source control.
Note: If you’re automating your infrastructure provisioning, it’s good practice to create a specific IAM user/role to execute the provisioning under (e.g. a ‘Builder’ user), rather than using your root account. This way to can tie down access to just what it needs to run to provide a finer degree of control/security.
Download Terraform
Download zip from https://www.terraform.io. Extract it somewhere on your machine and then add it to your executable PATH
$ export PATH=$PATH:~/your-install-location/terraform
If you want this to be persisted between terminal sessions, you can add to ~/.bash_profile (or whichever startup file you use). Note – I’m developing on a Mac, so these instructions will be slightly different for a Windows machine.
The Terraform Templates
The main terraform template is located at /IaC/terraform/fizzbuzz/main.tf. This file calls a module ‘s3-lambda-ddb/main.tf’ (I need to remove the s3 part, as it no longer provisions any S3 resources – that was while I was testing). As you can see – this file references the build artefact. If the version in the pom.xml file has changed – the build artefact name here will need updating accordingly.
module "fizzbuzz" {
    source = "../modules/s3-lambda-ddb"

    fizzbuzz_lambda_function_name = "alexa-fizzbuzzbongo-skill"
    fizzbuzz_lambda_object_key = "alexa-fizzbuzzbongo-0.0.1-jar-with-dependencies.jar"
	dynamoDbTable = "FizzBuzzBongoUserData"
}
The module file handles the actual creation of the lambda (including the upload of the JAR file) and the the DynamoDB table. It also sets the Alexa trigger for the lambda and provisions all the permissions it needs.
There are some settings here that can be tweaked – namely the lambda memory allocation and the DynamoDB read and write capacity. It all depends on how much the skill gets used ‘in the wild’.I suspect I may increase the lambda memory (to improve cold start times) and reduce the DynamoDB read/write capacities (as I don’t think it will get used that much). However – following the principle of not optimitising prematurely – I’ll wait and see what real world usage is first. I’ll probably cover tweaking these in another article.
variable "fizzbuzz_lambda_function_name" {}
variable "fizzbuzz_lambda_object_key" {}
variable "dynamoDbTable" {}

output "fizzbuzz_lambda_arn" {
    value = "${aws_lambda_function.fizzbuzz_lambda.arn}"
}

########################
#
# Lambda
#

data "template_file" "fizzbuzz_lambda_assume_role_policy" {
    template = "${file("${path.module}/lambda-assume-role-policy.json")}"
}

data "template_file" "fizzbuzz_lambda_role_policy" {
    template = "${file("${path.module}/lambda-role-policy.json")}"
}

resource "aws_iam_role" "fizzbuzz_lambda_assume_role" {
  name = "${var.fizzbuzz_lambda_function_name}"
  assume_role_policy = "${data.template_file.fizzbuzz_lambda_assume_role_policy.rendered}"
}

resource "aws_lambda_function" "fizzbuzz_lambda" {
  function_name    = "${var.fizzbuzz_lambda_function_name}"
  runtime          = "java8"
  filename         = "../../../target/${var.fizzbuzz_lambda_object_key}"
  handler          = "com.adrianmilne.fizzbuzz.GameSpeechletRequestStreamHandler"
  role             = "${aws_iam_role.fizzbuzz_lambda_assume_role.arn}"
  memory_size      = "512"
  timeout          = "30"
}

resource "aws_iam_policy" "fizzbuzz_lambda_policy" {
  name   = "${var.fizzbuzz_lambda_function_name}-policy"
  path   = "/"
  policy = "${data.template_file.fizzbuzz_lambda_role_policy.rendered}"
}

resource "aws_iam_policy_attachment" "fizzbuzz_lambda_policy_attach" {
  name       = "${var.fizzbuzz_lambda_function_name}-policy-attachment"
  roles      = ["${aws_iam_role.fizzbuzz_lambda_assume_role.name}"]
  policy_arn = "${aws_iam_policy.fizzbuzz_lambda_policy.arn}"
}

# create the Alexa trigger
resource "aws_lambda_permission" "alexa-trigger" {
  statement_id 	= "AllowExecutionFromAlexa"
  action 		= "lambda:InvokeFunction"
  function_name = "${aws_lambda_function.fizzbuzz_lambda.function_name}"
  principal     = "alexa-appkit.amazon.com"
}


########################
#
# DynamoDB
#

resource "aws_dynamodb_table" "fizzbuzz_dynamodb_table" {
  name           = "${var.dynamoDbTable}"
  read_capacity  = 5
  write_capacity = 5
  hash_key       = "UserId"

  attribute {
    name = "UserId"
    type = "S"
  }

  ttl {
    attribute_name = "TimeToExist"
    enabled = false
  }

  tags {
    Name = "demo"
  }
}
Deploying to AWS Using Terraform
Using terraform is really simple – you first need to navigate to the directory in the repo code that contains the main Terraform template (the ‘main.tf’ file).
$ cd ~/repo-install-location/alexa-fizzbuzz-demo/IaC/terraform/fizzbuzz
The first step is to initialise Terraform for this project (you only need to do this once).
$ terraform init
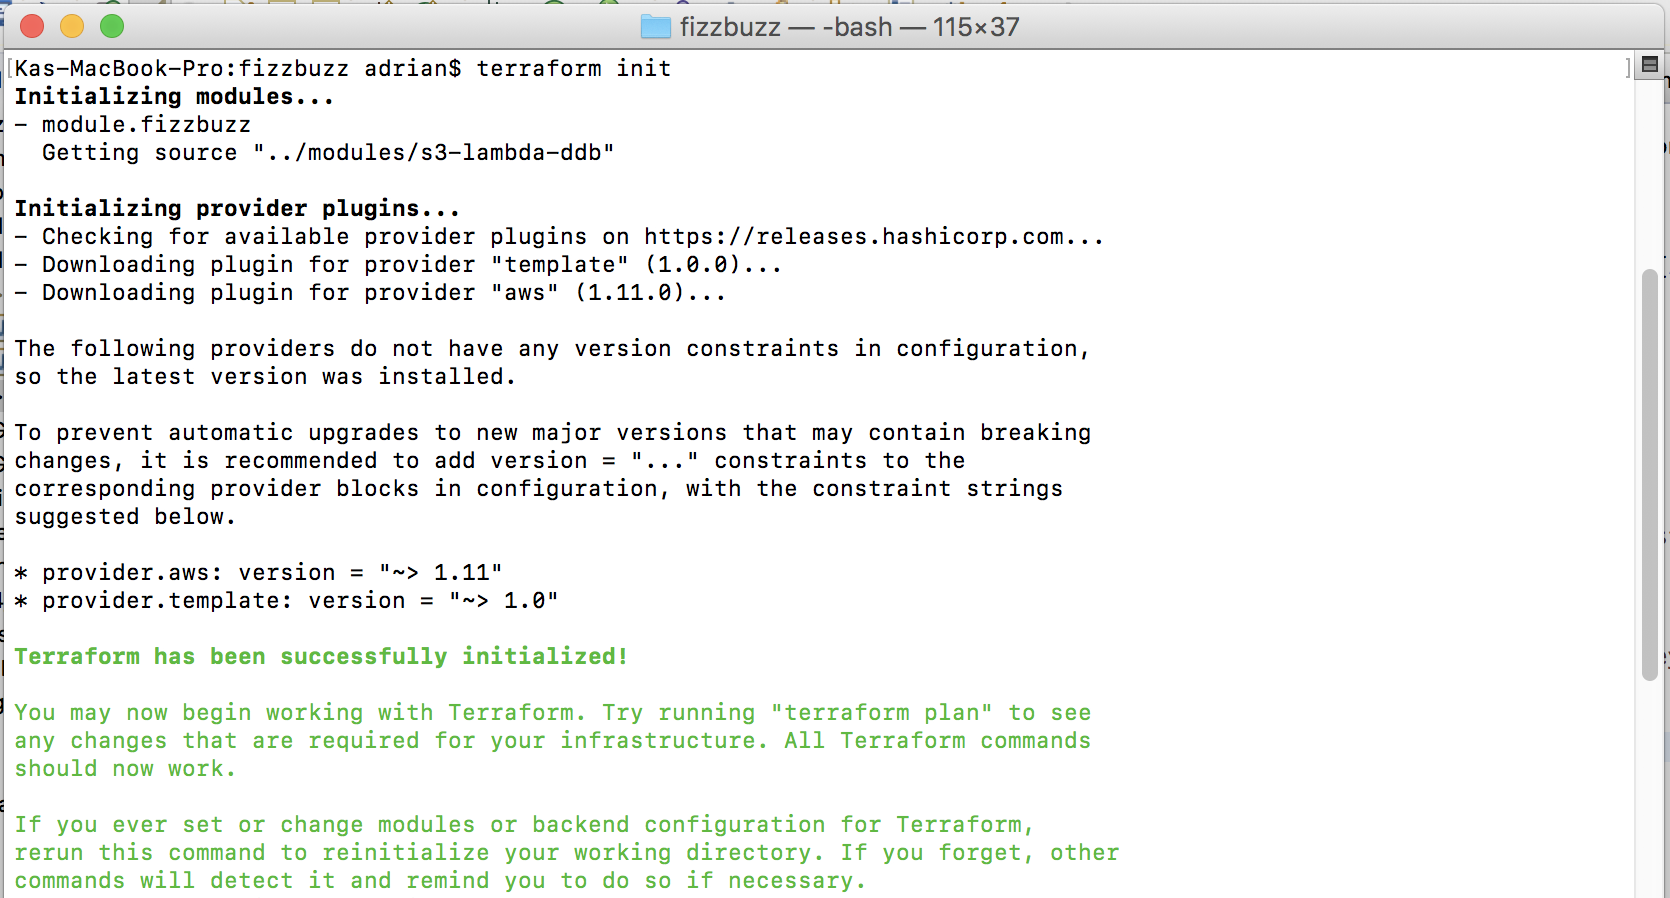
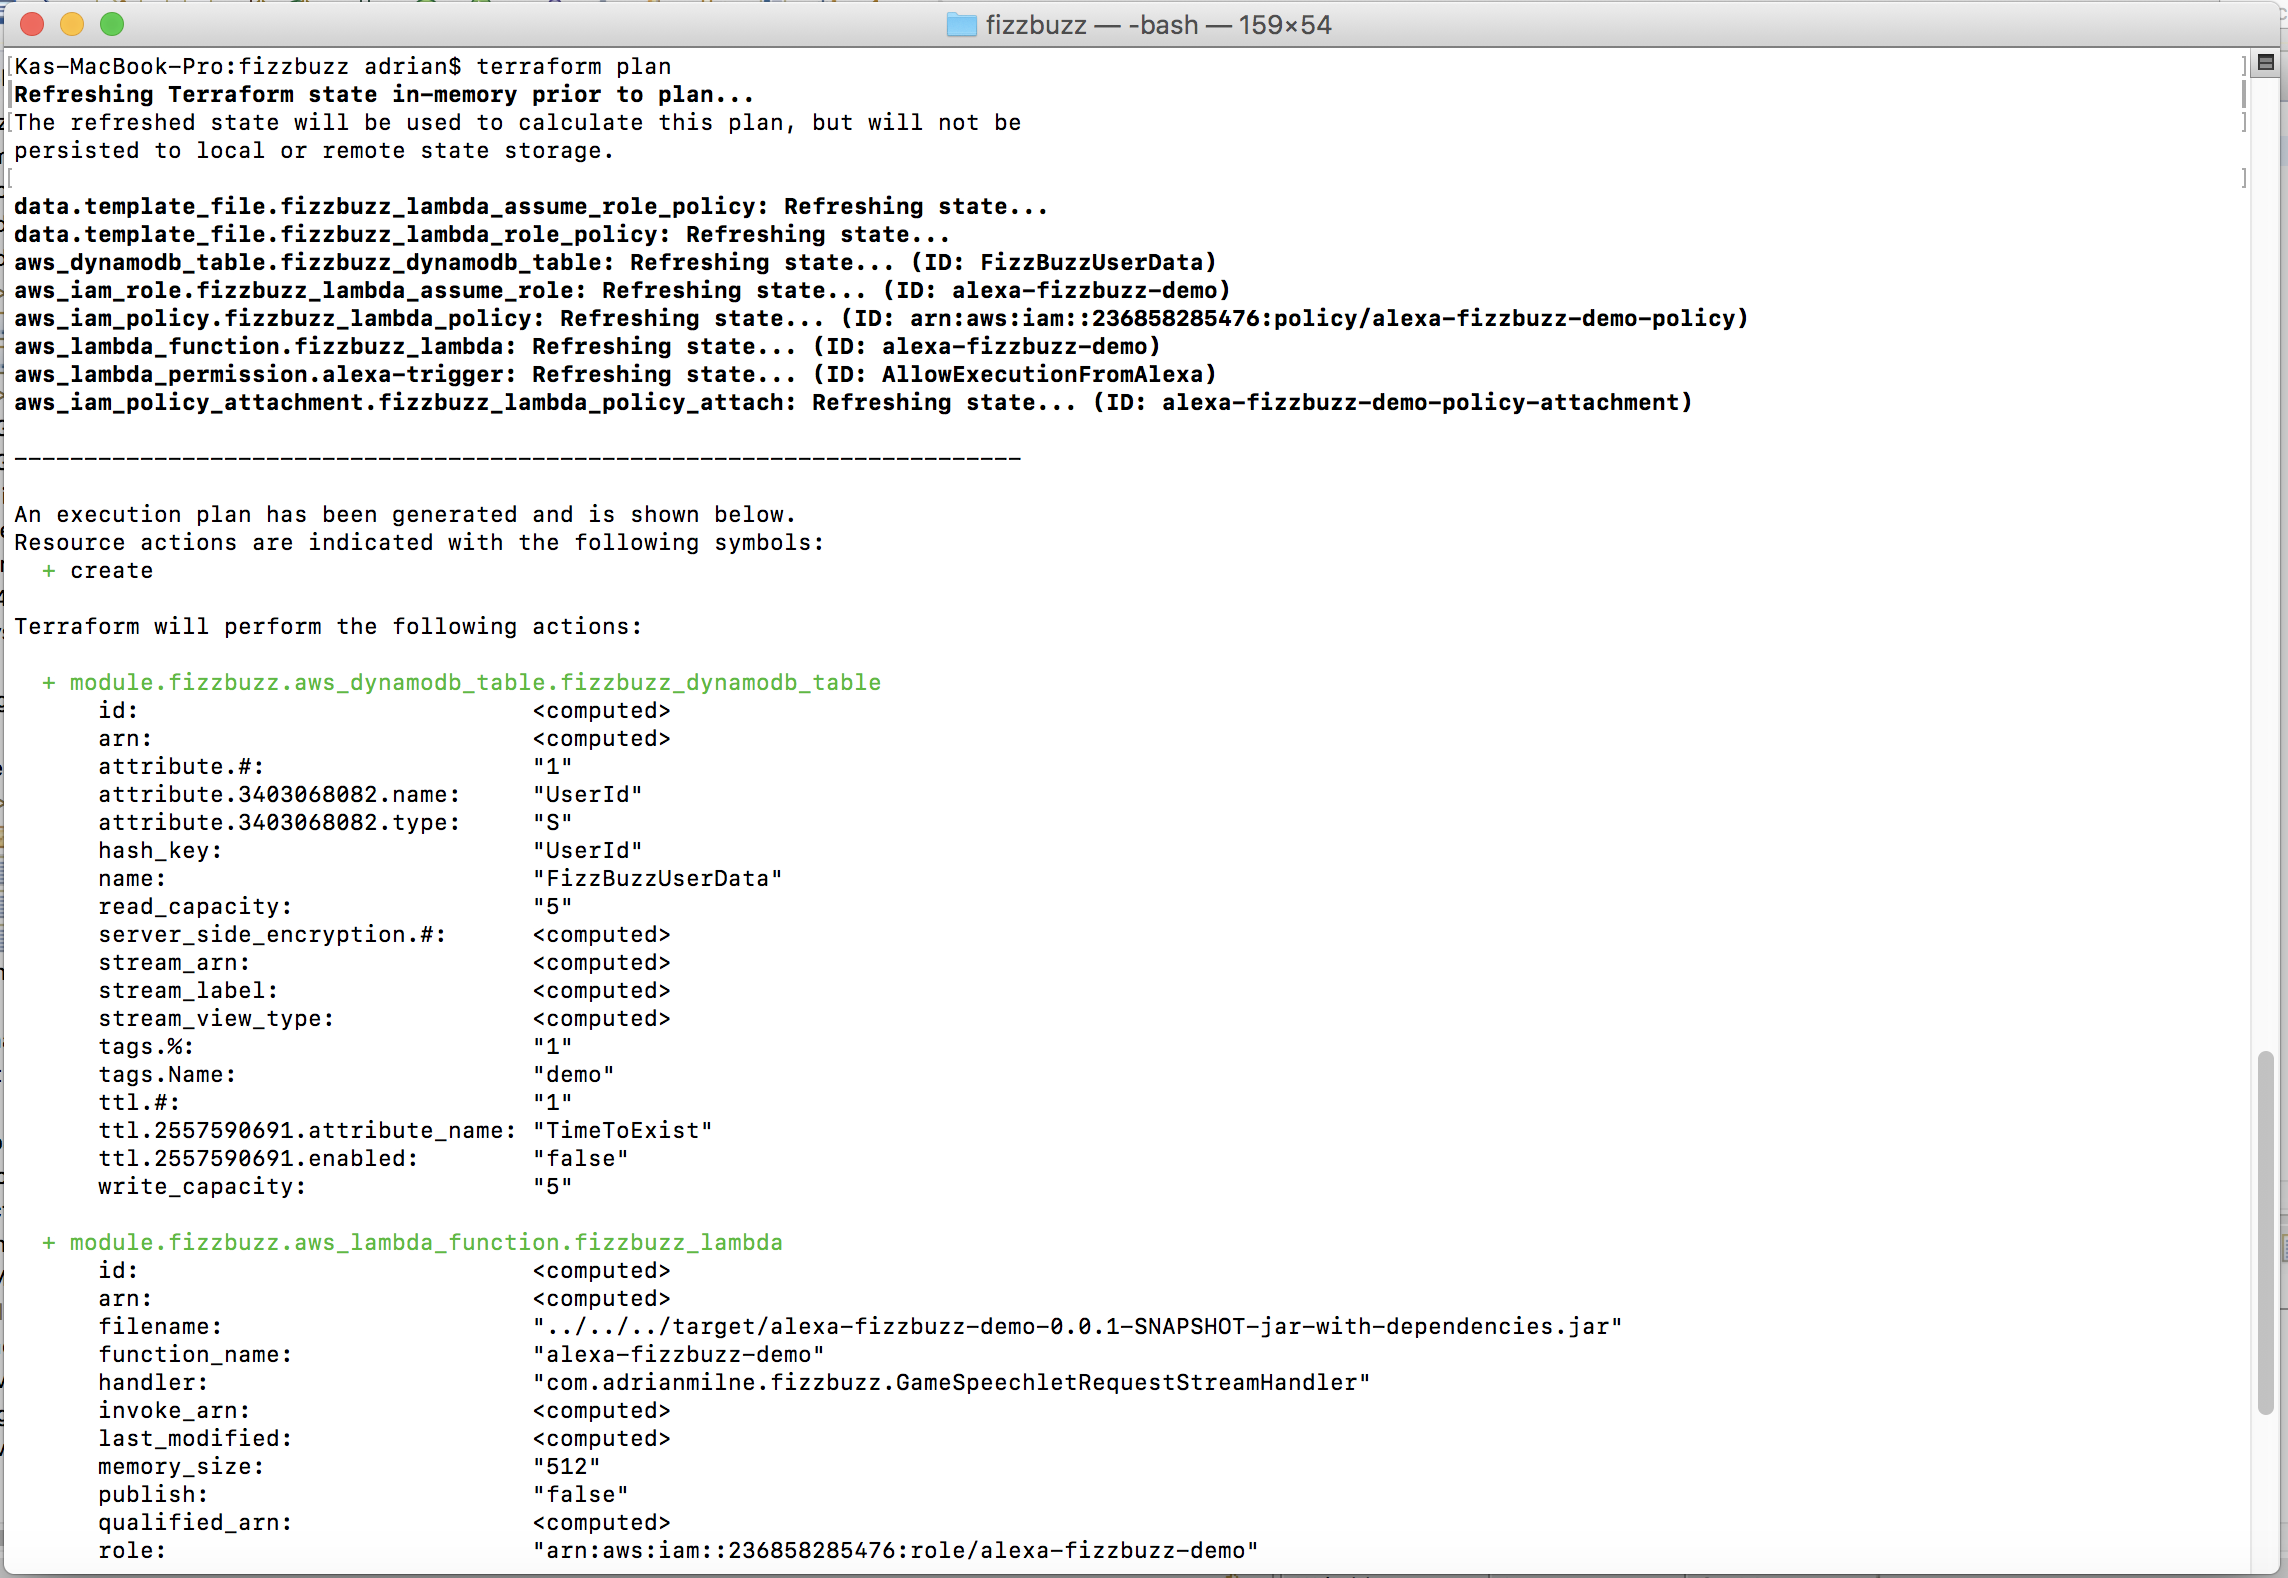
This will setup all the necessary modules. Next, do a ‘plan’ – this will show what actions Terraform will perform when you run ‘apply’, without actually changing anything in AWS.
$ terraform plan
If everything looks ok – the final step is to actually perform the deployment, using:
$ terraform apply

This will prompt you before applying the changes (type ‘yes’ when asked). This will then create the DynamoDB table, upload the JAR file and create the Lambda and set all associated permissions. Note: You have to have run the maven build before doing this as it will pick up the build JAR artefact from the project target directory automatically.
Note: You can also tear down everything down again (if you want to) easily using:
$ terraform destroy
Checking the Artefacts in AWS – Lambda & DynamoDB Table
So that’s it – once Terraform has run, the new artefacts will be created in the account and region you specified. You will notice a new terraform.tfstate file has been created. This file allows terraform to keep track of the resources it manages. Keep this file if you want to keep managing your state via Terraform. This is fine if you’re a solo developer, but isn’t scalable if you are in a team. If you do work in a team environment, you need to look at Terraform remote state storage (you can store state in S3, for example).
Note: I’ve added the terraform state files to .gitignore (to prevent me from uploading mine accidentally. You may want to change .gitignore if you decide you want to commit yours.
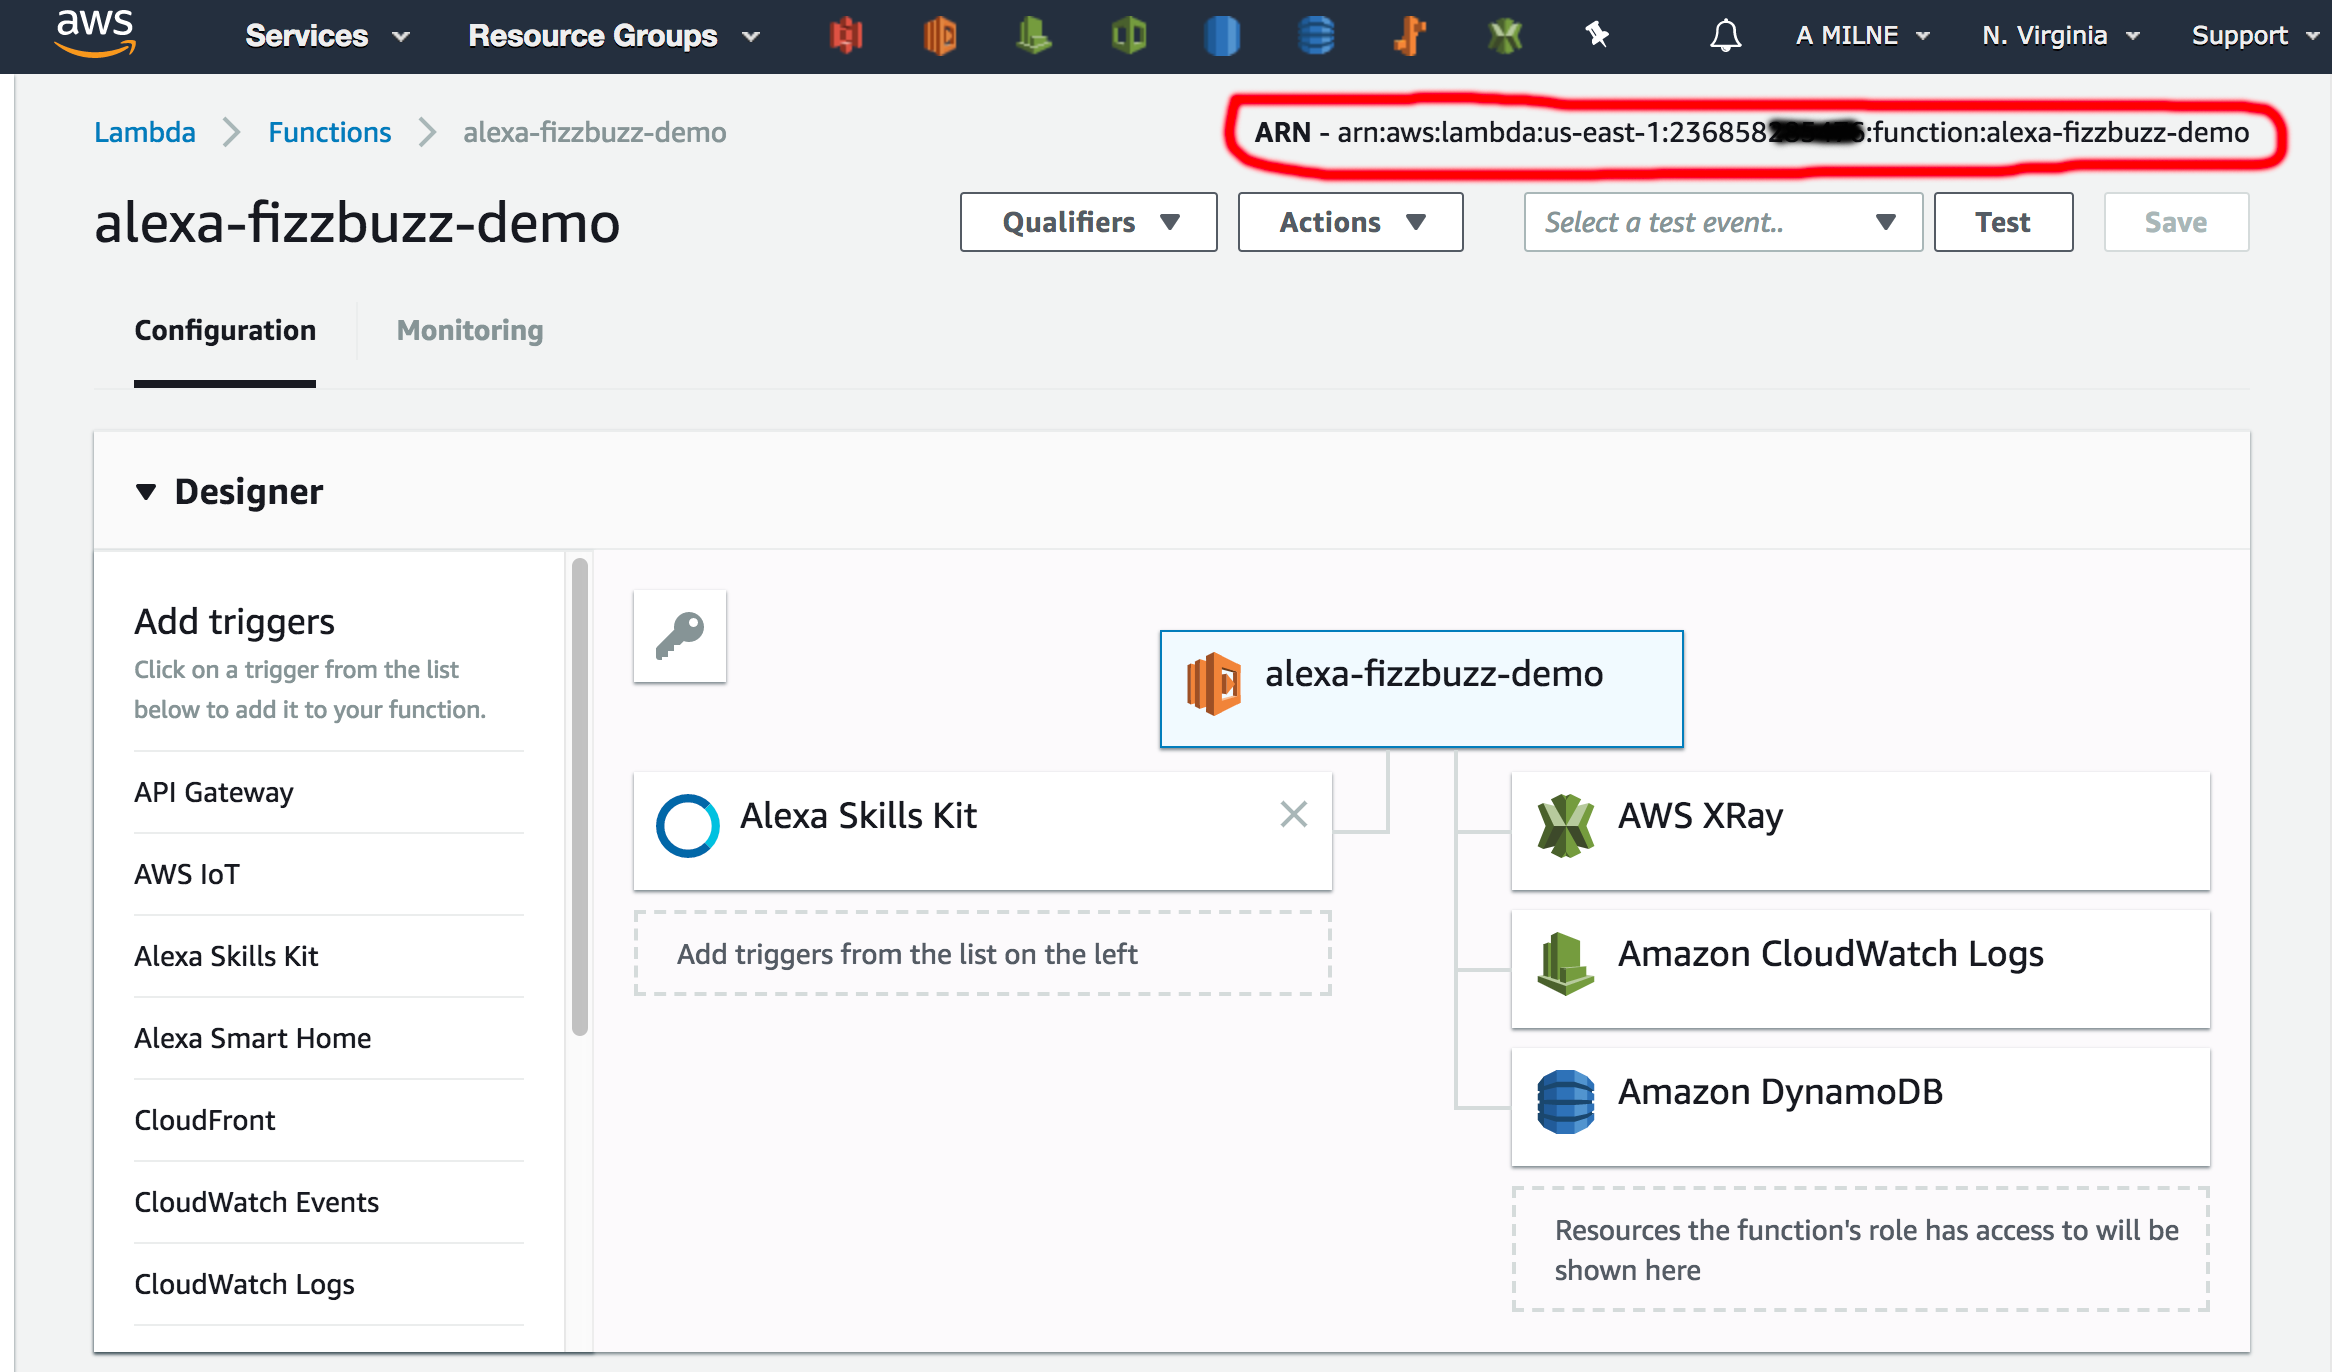
If you log into the AWS console – you will be able to view the new artefacts. First the alexa-fizzbuzz-demo lamda. As you can see – it is has been configured to be triggered by Alexa, and has permissions to use XRay, Cloudwatch logging and DynamoDB.
You can see the ARN in the top right hand corner of the screen (circled in red). We will need that in Article 3 – it will be the endpoint we point the Alexa skill to.
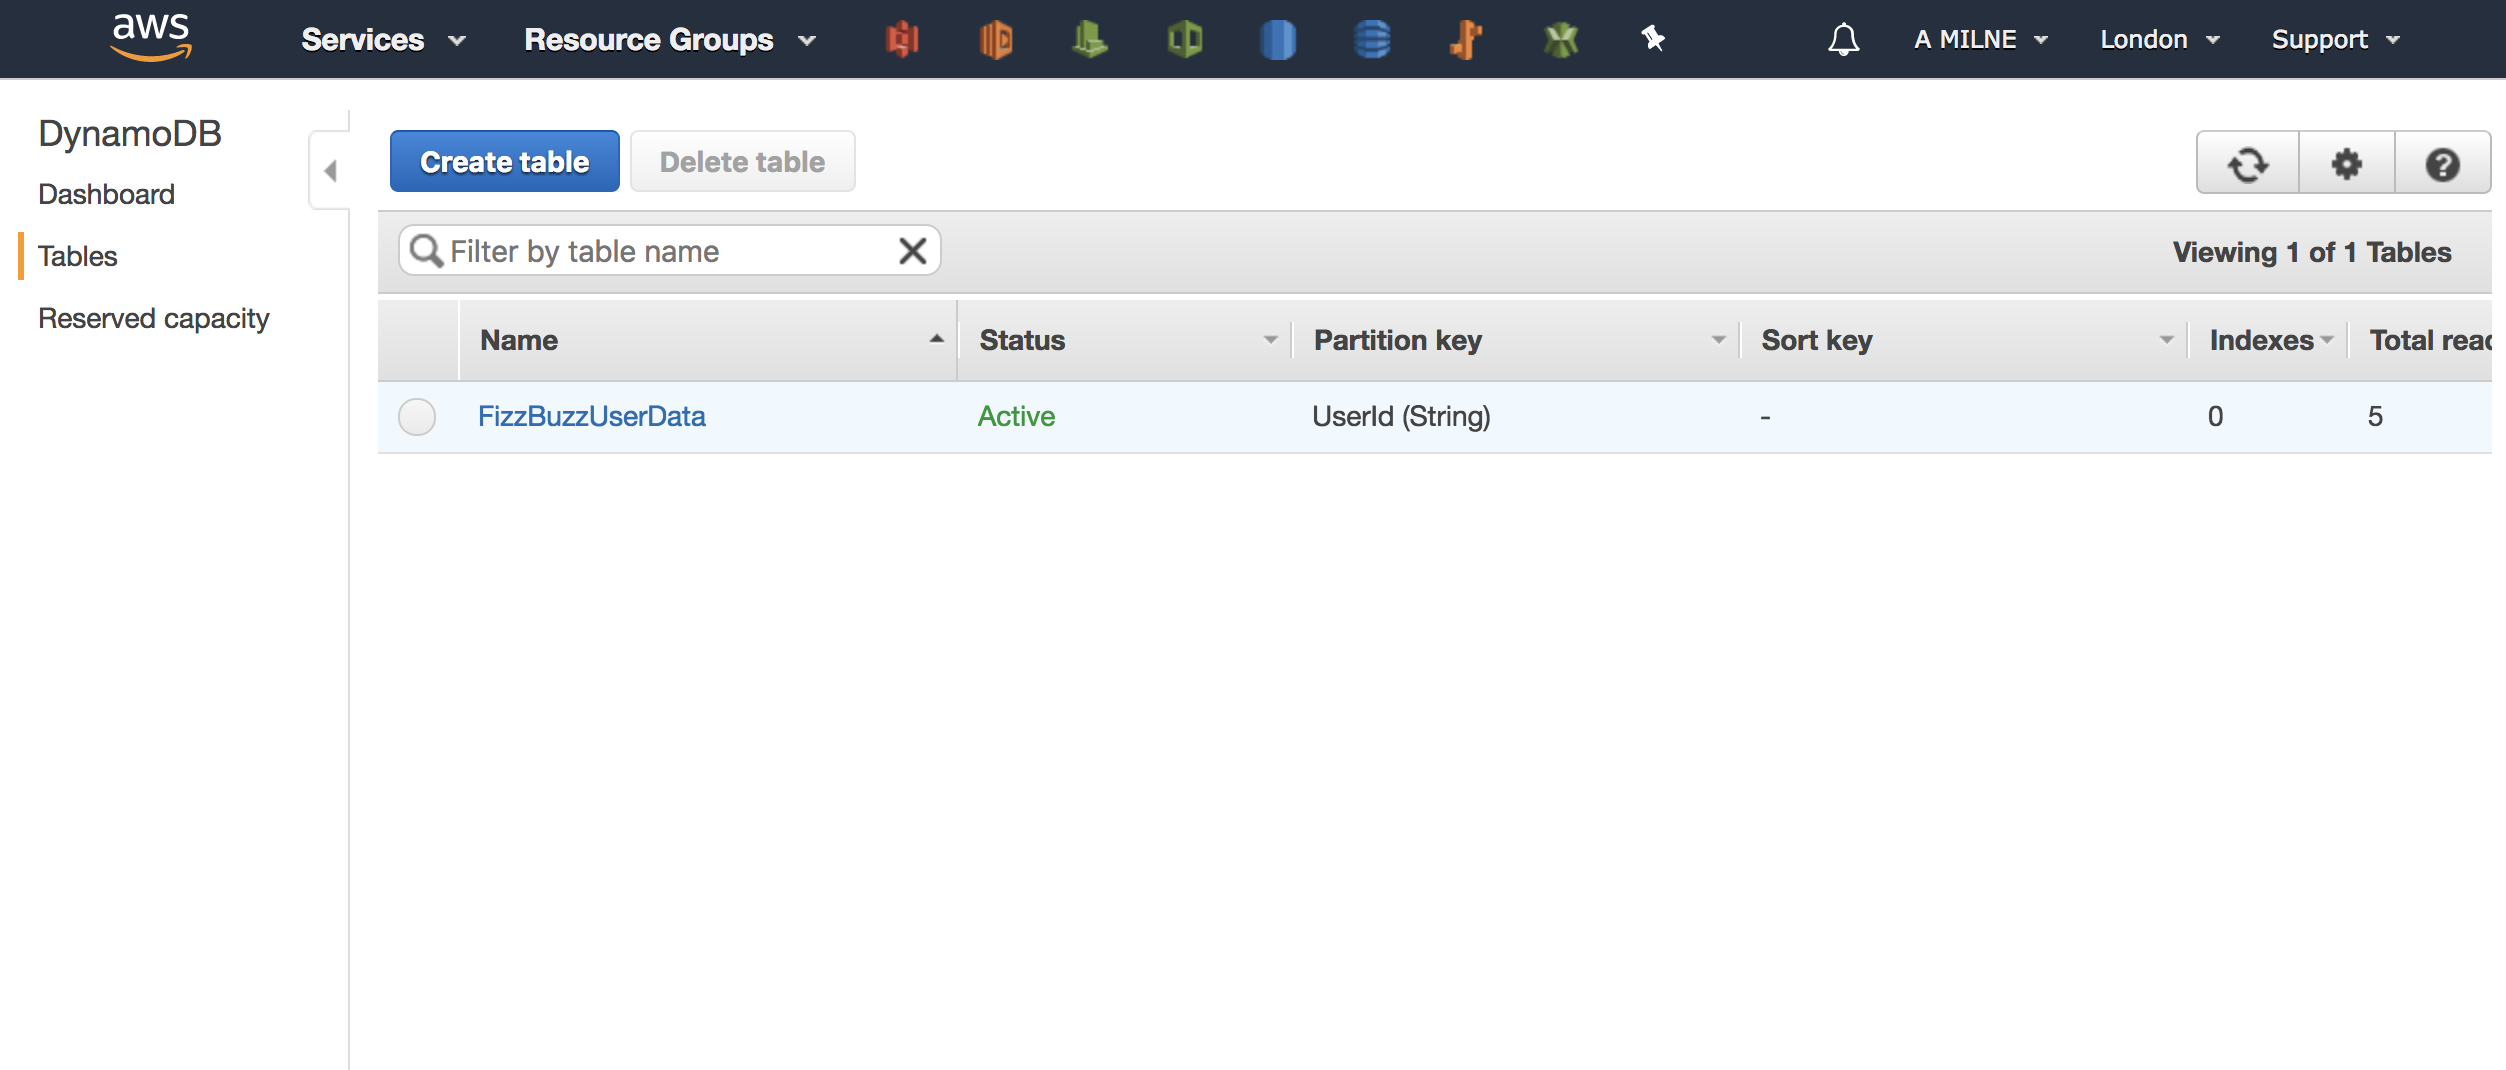
The other main artefact we have created is a DynamoDB table (see below). This will be used to maintain session state while the game is running.
Conclusion
In this post, we built on the topic covered in the first article “Developing an Alexa Skill: Part 1, Creating the Java Lambda“. We now have a back-end infrastructure deployed in AWS which is ready to service an Alexa skill. The next article, “Developing an Alexa Skill: Part 3, Publishing the Skill“, shows how to publish it in the Alexa store.